This website contains affiliate links. We earn a commission when you buy a product or service using these links.
Publish date: February 23, 2023
Step #3
To do list for this page:
Sign up for web hosting and connect your domain name to your webhost.
What is web hosting?
After you have your domain name, you’ll need to sign up for web hosting. Web hosting is basically renting space on a computer server that’s always connected to the internet. There are many companies that provide web hosting. I use HostGator because they’re a large and growing company with relatively inexpensive fees.
Hosting and Domain all starting from $3.75
Web hosting is generally paid by the month. HostGator has a “Hatchling” plan for a single website or a “Baby” plan for up to five websites. As of the writing of this article, they’re running an introductory offer of $2.75 a month for the Hatchling plan, and $3.50 a month for the Baby plan. I have the Baby plan since I have more than one website. They also have a deal where you can get your domain name registration for free for the first year when you sign up for web hosting. You can get your custom email addresses (e.g. mail@yournewwebsite.com) for free through HostGator. They don’t even charge for SSL (Secure Sockets Layer, a website security feature).
HostGator web hosting:
- Reliable hosting with a 99.9% uptime guarantee
- Ability to host up to five websites with the “Baby” plan and higher
- Free email addresses with your domain name
- Free SSL (Secure Sockets Layer, a website security feature)
Domain Mapping
Once you have your domain name and your hosting, you need to connect the two (unless you already did that in the signup process). This is often referred to as domain mapping (or DNS – Domain Name System). The domain name (www.website.com) is like a home address, and the web hosting is like your actual physical house. Domain mapping is linking the two so that when someone types your URL (Uniform Resource Locator, or web address) into the address bar, they are taken to the files that are your website (which will be on the web hosting provider’s computer).

What’s the difference between a domain name and URL?
- Domain name – Your domain name is your website name (like website.com).
- URL – URL (Uniform Resource Locator) is a web address. While your domain name is website.com, each of the pages on your website have a unique address that begins with your domain name (like www.website.com/random-page.html or www.website.com/another-random-page.html).
Changing nameservers
The “nameservers” are what points your URL to your hosting provider. Again, if you get your domain and web hosting from the same company, this may be easier to connect the two. They will probably walk you through it in the signup process. If you must do this by hand, this is how you can do it. In this example, my domain name is registered with GoDaddy, and my web hosting is at HostGator.
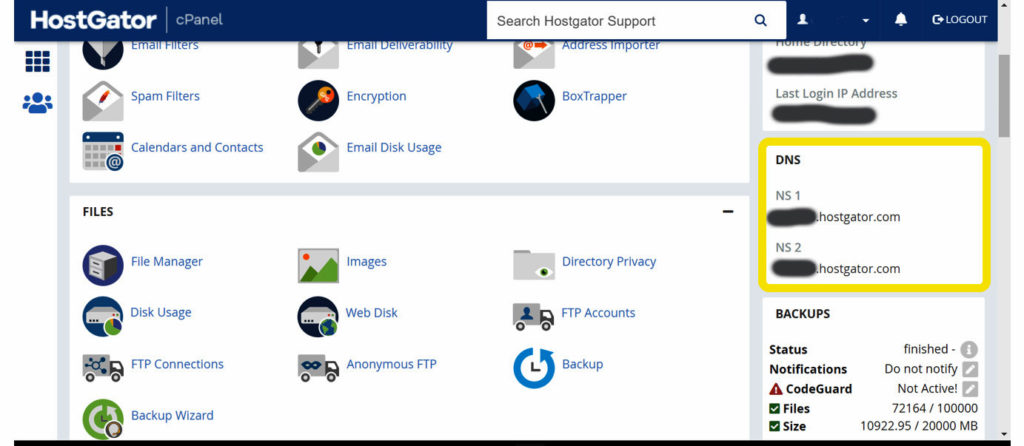
Your DNS nameservers are listed on the right side of the control panel in HostGator. There are two of them (NS1 = Nameserver1 & NS2 = Nameserver 2). You will be entering these two nameservers into your domain name provider (like GoDaddy).

Inside GoDaddy, find the list of your domains. You can get there by clicking on your name in the upper right corner of the screen and go into “My Products.” Scroll down to find the URL that you want to work with. Click on the “DNS” link.

Then scroll down to the “Nameservers” section and click on “Update.”

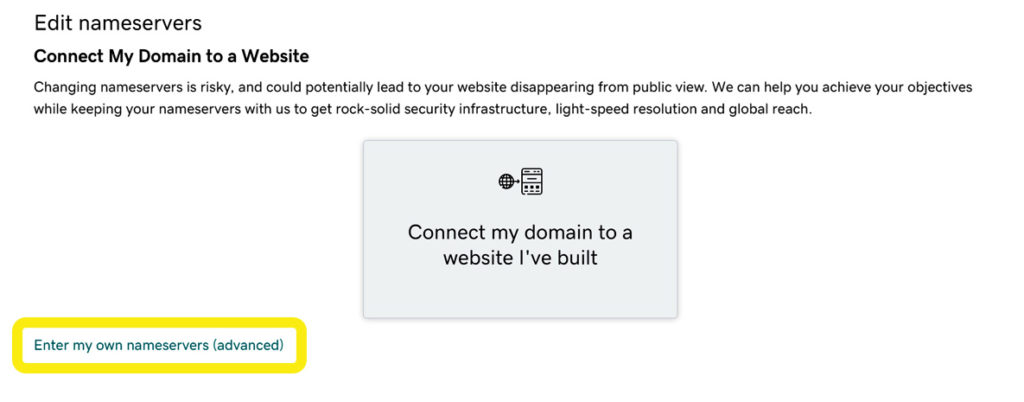
Click on “Enter my own nameservers (advanced).”

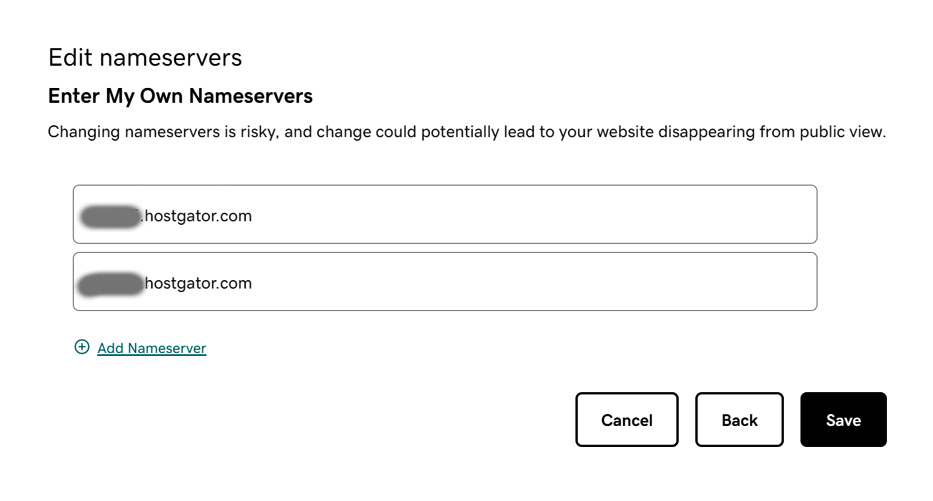
Select and copy the first nameserver from HostGator and paste it into the first nameserver field. Then copy the second nameserver from HostGator and paste it into the second nameserver field.

This is as far as you can get today. You’ll have to wait until the nameservers are updated, which can take up to 48 hours. They generally email you when it’s ready.
Get 20% off all New HostGator Hosting plans with Coupon: SNAPPY.
What’s the next step?
Next you will need to install WordPress on your site. WordPress is a content management system. It will allow you to create webpages and manage everything on your site without having to know how to code. Read more about it in How to install WordPress.

