Publish date: April 29, 2023
HTML (Hypertext Markup Language) is the basic code used for creating webpages. The HTML code on a page defines the structure and layout of the page in the browser as well as formatting the text. You also use HTML to add images and other elements to the page and create hyperlinks.

Why learn HTML basics if you use WordPress
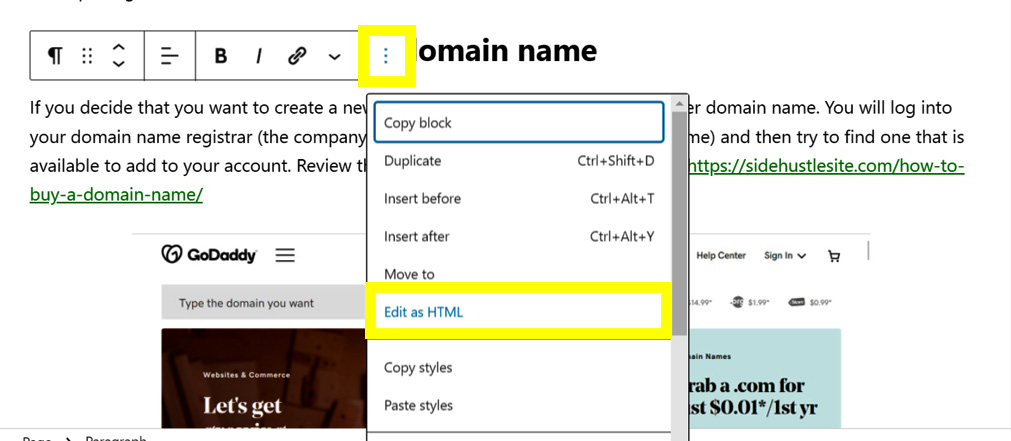
You might be thinking, “I use WordPress, so I don’t need to know code.” While that’s true, there are many times when it’s helpful to know what’s going on behind the scenes. It may come in handy if you want to tweak the code to change the appearance of the item. I often edit the HTML of a block to get it to look just how I want. To do this in WordPress, click in the block that you want to edit, click on the button with three vertical dots to open the menu, then click on “Edit as HTML.”
HTML Editors
If you were to create a webpage from scratch using HTML, you would need to use some sort of HTML editor. The most basic editors are Notepad which comes free with Microsoft Windows or TextEdit on a Mac. Adobe Dreamweaver is a much more robust editor that I have used to create websites.
Basic HTML Webpage Structure
At a minimum you should have the following HTML tags to create a webpage. On this page we’ll learn about each one of these tags and more.
<!DOCTYPE html>
<html>
<head>
<title>Page Title</title>
</head>
<body>
Content of page
</body>
</html>
DOCTYPE
The “DOCTYPE” or document type tells the browser what type of document this is so that it can display it correctly in the browser. In the example below we are specifying that the document is html.
<!DOCTYPE html>
html
The html tag tells the browser where the HTML code begins and ends. The closing tag contains a slash /. Not all HTML tags have opening and closing tags. With the tags that do, you generally nest other tags inside of the opening and closing tags.
<html> = opening html tag
</html> = closing html tag
lang
Inside the opening html tag, you can also optionally specify what the language of the website is. This information is helpful for browsers and search engines. There are two-letter codes to indicate the language such as “en” for English and “es” for Spanish (español). You can also include another two letters to indicate what country the language is from (the dialect). For example, you could include us for the United States.
<html lang=”en”>
</html>
<html lang=”en-us”>
</html>
head
The head section contains information about the document that will not be displayed on the page. This includes the page title (described in the next section), meta data (information about the page), script (to make the page interactive), and links to outside resources like CSS and JavaScript.
<head>
</head>
title
The title is what appears in the bar at the top of the browser. For example, the title of this page is “HTML Basics – Side Hustle Site.” The title is very important for SEO because it will appear on the search engine results page. You want a title that will entice people to click and visit your page. Ezoic includes a free title tag tester in its NicheIQ SEO tools. With this, you can test to see which of all of the possible title tags that you are considering is the most effective.
<title>Title of Page</title>
meta
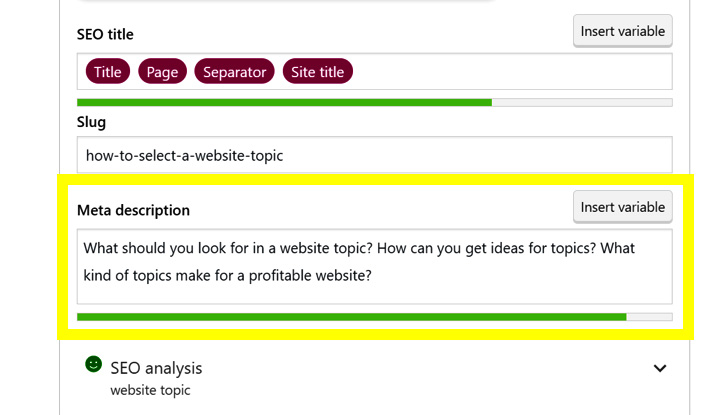
Meta tags can contain information about the document such as a description of the page, the category and the author. The author tag is automatically created in WordPress. Categories can be assigned to posts when you create them. You can write the meta description of a page in WordPress using the Yoast plugin. All meta tags are contained in the head section and are not displayed on the page.
body
The content of the page is contained between the body opening and closing tags. The body includes the text that appears on the page and code to display images and other elements.
<body>
</body>
Headings
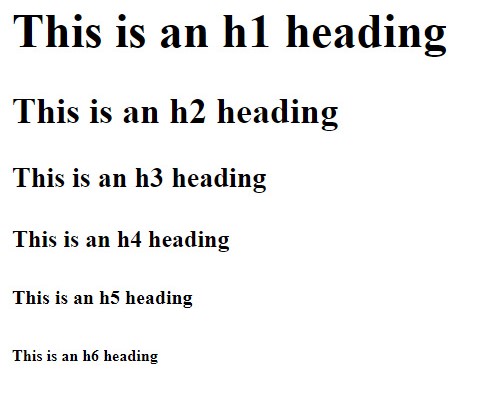
Headings are the titles and subtitles of the page. The H1 heading is the main heading of the page or the title of the article. The H1 lets search engines as well as users know what the page is about. Using keywords in a heading can help your SEO. There should never be more than one H1 heading on a page.
While the H1 is the main title, other types of headings can be used as subtitles. H2s label major sections of the article. H2s are helpful for search engines to know what sections are about. They also help break up long articles for readers. In addition to H2s, you can add H3s, H4s, H5s or H6s to break down further the hierarchy of your article.
Code:
<h1>This is an h1 heading</h1>
<h2>This is an h2 heading</h2>
<h3>This is an h3 heading</h3>
<h4>This is an h4 heading</h4>
<h5>This is an h5 heading</h5>
<h6>This is an h6 heading</h6>
Display:
Don’t use headings if you just want to make text bigger. Use the text formatting tools in WordPress to enlarge text that is not a heading. If you label something as a heading that is not, you will send erroneous cues to the search engines.
Paragraphs
Individual paragraphs are identified by a <p> opening tag and a </p> closing tag. Each paragraph is displayed on a separate line and separated by a small space.
Code:
<p>This is an example of a paragraph.</p>
Display:
This is an example of a paragraph.
Practice
Let’s pause for a moment to review the many tags that we have already learned. In a Notepad or TextEdit document, create a very simple HTML document. Include the following . . .
- A document type tag to let the browser know that this is an HTML document.
- An opening html tag that also specifies that the language of the document is English
- An opening head tag
- A page title of “What is HTML?”
- A closing head tag
- An opening body tag
- An h1 heading of “What is HTML?”
- A paragraph that says, “HTML (Hypertext Markup Language) is the basic code used for creating webpages. The HTML code on a page defines the structure and layout of the page in the browser as well as formatting the text. You also use HTML to add images and other elements to the page and create hyperlinks.”
- A closing body tag
- A closing html tag
- Save the file with the file name “practice.html”
- Open the file to see what your webpage looks like. Since it has the .html extension, it should automatically open in a browser.
Here’s what the code should look like when you’re finished (below). If you have all the code smooshed together, instead of on a separate line, that’s ok. It’s easier for humans to read when each is on a separate line, but computers don’t care what it looks like.
<!DOCTYPE html >
<html lang=”en”>
<head>
<title>What is HTML?</title>
</head>
<body>
<h1>What is HTML?</h1>
<p>HTML (Hypertext Markup Language) is the basic code used for creating webpages. The HTML code on a page defines the structure and layout of the page in the browser as well as formatting the text. You also use HTML to add images and other elements to the page and create hyperlinks.</p>
</body>
</html>
Here’s what the document should look like in a browser.

Let’s continue to learn some more HTML tags that we can use on our page.
Line Break
The <br> tag is for a line break. You use this if you want text to appear close together on separate lines.
Code:
<p>example line 1<br>
example line 2<br>
example line 3</p>
Display:
example line 1
example line 2
example line 3
Anchor tag
Anchor tags <a></a> are used to create hyperlinks, or links to other pages or resources on your site or others. At a minimum the anchor must also include the hypertext reference (the URL that you are linking to) and the anchor text (hyperlink text). The anchor text goes in between the opening anchor tag <a> and the closing tag </a>.
Code:
<a href=”https://www.sidehustlesite.com”>Side Hustle Site</a>
Display:
Side Hustle Site
You can learn more about hyperlinks in our All about links article.
Image tag
The image tag <img> is used to display a picture on a page. The image tag is just a single tag (instead of an opening and closing tag). The src attribute identifies the location of the image file to be displayed. The width and height attributes specify the pixel size of the image files. The alt text (alternative text) displays if the image doesn’t load and provides information for screen readers for the visually impaired.
Code:
<img src=”horse.jpg” width=”200″ height=”181″ alt=”Horse”>
Display:

You can learn more about images in our article How to add images to your pages.
Practice
Let’s take a break and try out some of the new HTML tags.
- Open the practice.html file in Notepad (on a PC) or TextEdit (on a Mac) so that you can edit it.
- After the closing paragraph tag that you previously created, press enter to go down to a new line.
- Create an h2 heading that says, “Hyperlinks”
- Add an opening paragraph tag.
- Create a hyperlink to this website’s home page https://www.sidehustlesite.com. If you already studied the “All about links” lesson, you can optionally add extra elements to your links such as a title and target.
- After the hyperlink, put a line break tag.
- Create another hyperlink to https://www.google.com .
- Put a line break tag after that hyperlink.
- Create one more hyperlink to https://npr.org .
- Put a closing paragraph tag after the last hyperlink.
- Press enter to go down to the next line.
- Create an image tag to an image that is stored on this website. The location (src) is https://www.sidehustlesite.com/practice.jpg . The width is 282 and the height is 271. Assign the alt text “Practice.”
- Save the file again as practice.html and open it in a browser to view it.
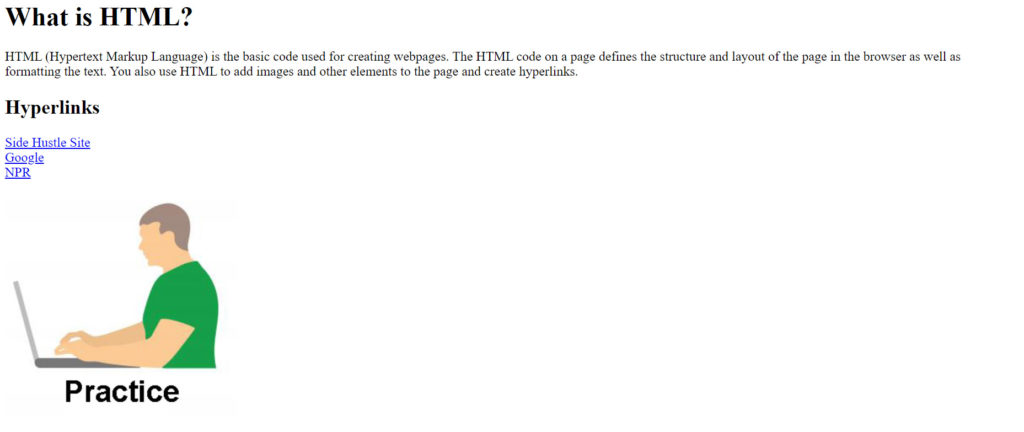
Here’s what the code should look like when you’re finished.
<!DOCTYPE html >
<html lang=”en”>
<head>
<title>What is HTML?</title>
</head>
<body>
<h1>What is HTML?</h1>
<p>HTML (Hypertext Markup Language) is the basic code used for creating webpages. The HTML code on a page defines the structure and layout of the page in the browser as well as formatting the text. You also use HTML to add images and other elements to the page and create hyperlinks.</p>
<h2>Hyperlinks</h2>
<p><a href=”https://www.sidehustlesite.com”>Side Hustle Site</a><br>
<a href=”https://www.google.com”>Google</a><br>
<a href=”https://npr.org”>NPR</a></p>
<img src=”https://www.sidehustlesite.com/practice.jpg” width=”282″ height=”271″ alt=”Practice”>
</body>
</html>
Here’s what the document should look like in a browser.
Let’s learn some more HTML tags.
Text Formatting
There are a limited number of HTML tags for adding formatting to your text. You can add more formatting via CSS.
<b>bold</b> = bold
<strong>strong</strong> = strong
(Strong is used to let search engines know that this text is important. If you want to bold text for some other reason, just use <b></b>.)
<i>italic</i> = italic
<em>emphasized</em> = emphasized
(Emphasized is used to let search engines know that this text is important. If you want to make text italic for some other reason, use <i></i>.)
<mark>marked</mark> = marked (highlighted text)
<small>small</small> = small
<sub>subscript<sub> = subscript (lowered text – H20)
<sup>superscript<sup> = superscript (raised text- 3rd)
Lists
There are two kinds of lists that you can create in HTML: ordered lists and unordered lists. Ordered lists are numbered lists. Unordered lists are bulleted lists. The <ol></ol> tags mark an ordered lists while the <ul></ul> tags mark an unordered list. The <li></li> tags mark each item in the list.
Ordered list
Code:
<ol>
<li>List item 1</li>
<li>List item 2</li>
<li>List item 3</li>
</ol>
Display:
- List item 1
- List item 2
- List item 3
Unordered list
Code:
<ul>
<li>List item 1</li>
<li>List item 2</li>
<li>List item 3</li>
</ul>
Display:
- List item 1
- List item 2
- List item 3
Practice
Let’s take a break and try out some of the new HTML tags.
- Open the practice.html file in Notepad (on a PC) or TextEdit (on a Mac) so that you can edit it.
- After the last closing paragraph tag, press enter to go down to a new line.
- Create an h2 heading that says, “Samples of HTML text formatting.”
- Create an unordered list (bulleted list) with the following items. Format the words as they appear (bold, italic, etc).
- This is an example of bold.
- This is an example of italic.
- This is an example of marked.
- This is an example of small.
- Subscript – H2O
- Superscript – 1st, 2nd, 3rd
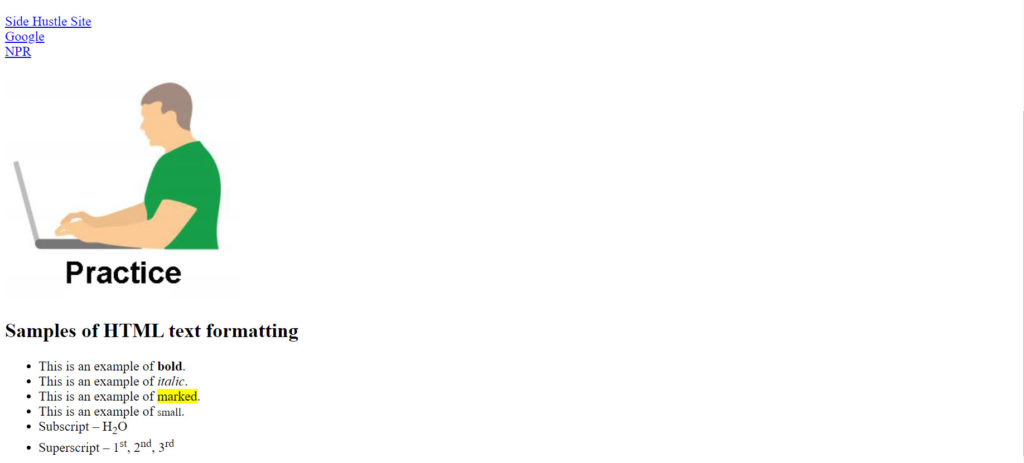
Here’s what the code should look like when you’re finished.
<!DOCTYPE html >
<html lang=”en”>
<head>
<title>What is HTML?</title>
</head>
<body>
<h1>What is HTML?</h1>
<p>HTML (Hypertext Markup Language) is the basic code used for creating webpages. The HTML code on a page defines the structure and layout of the page in the browser as well as formatting the text. You also use HTML to add images and other elements to the page and create hyperlinks.</p>
<h2>Hyperlinks</h2>
<p><a href=”https://www.sidehustlesite.com”>Side Hustle Site</a><br>
<a href=”https://www.google.com”>Google</a><br>
<a href=”https://npr.org”>NPR</a></p>
<img src=”https://www.sidehustlesite.com/practice.jpg” width=”282″ height=”271″ alt=”Practice”>
<h2>Samples of HTML text formatting</h2>
<ul>
<li>This is an example of <b>bold</b>.</li>
<li>This is an example of <i>italic</i>.</li>
<li>This is an example of <mark>marked</mark>.</li>
<li>This is an example of <small>small</small>.</li>
<li>Subscript – H<sub>2</sub>O</li>
<li>Superscript – 1<sup>st</sup>, 2<sup>nd</sup>, 3<sup>rd</sup></li>
</ul>
</body>
</html>
Here’s what the document should look like in a browser.
Table
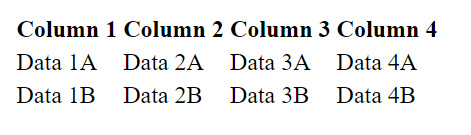
The last thing that we will go over is how to make a table in HTML. A table begins with the <table> opening tag and ends with the </table> closing tag. Table rows are marked with <tr></tr>. Heading cells are marked with <th></th> (table header) and regular cells are marked with <td></td> (table data). This is the code to create the basic structure of the table. The formatting (the appearance) would be controlled by CSS code.
Code:
<table>
<tr>
<th>Column 1</th>
<th>Column 2</th>
<th>Column 3</th>
<th>Column 4</th>
</tr>
<tr>
<td>Data 1A</td>
<td>Data 2A</td>
<td>Data 3A</td>
<td>Data 4A</td>
</tr>
<tr>
<td>Data 1B</td>
<td>Data 2B</td>
<td>Data 3B</td>
<td>Data 4B</td>
</tr>
</table>
Display:
Practice
Let’s try adding a table to our page.
- Open the practice.html file in Notepad (on a PC) or TextEdit (on a Mac) so that you can edit it.
- After the last closing unordered list tag </ul>, press enter to move down to a new line.
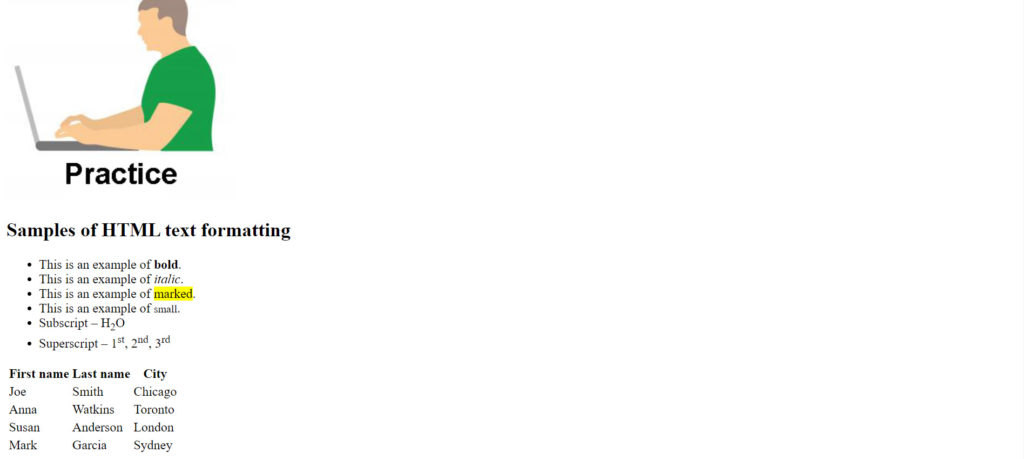
- Create the following table. It won’t have lines and be formatted like the following table, but you will create the basic structure of the table.
| First name | Last name | City |
| Joe | Smith | Chicago |
| Anna | Watkins | Toronto |
| Susan | Anderson | London |
| Mark | Garcia | Sydney |
Here is what the code for the table should look like.
<table>
<tr>
<th>First name</th>
<th>Last name</th>
<th>City</th>
</tr>
<tr>
<td>Joe</td>
<td>Smith</td>
<td>Chicago</td>
</tr>
<tr>
<td>Anna</td>
<td>Watkins</td>
<td>Toronto</td>
</tr>
<tr>
<td>Susan</td>
<td>Anderson</td>
<td>London</td>
</tr>
<tr>
<td>Mark</td>
<td>Garcia</td>
<td>Sydney</td>
</tr>
</table>
Here is what it should look like in the browser.
You did great! As you can see, coding a page from scratch like this can be very time-consuming. It is helpful to know basic HTML, however, so that you know the basic structure of your page and can edit the code in HTML if you desire.
Related topics:
All about links
How to add images to your pages
Page SEO